转载自 chengway 的 :ViewController Programming Guide 笔记
最近花时间重读了一遍 View Controller Programming Guide,官方文档无论怎么都是最值得花时间去研读的,Apple 在 iOS 8.0 之后也更新了文档,我这个小 blog,今年挖了不少坑,不过从后台统计看,每天也有不少人从 Google 找到这里,既然能帮到大家,我就抽时间把之前坑都填了。关于 Advanced NSOperation Apple 又更新了代码,Limboy 也写了一篇深入浅出的 介绍,另外他最新的一篇 学习如何学习 也值得推荐。不忘初心,方得始终!
Defining Your Subclass
我们通常会子类化 UIViewController 来展示 App 的内容
Defining Your UI
通常你会使用 Storyboard 来定义 UI
- 为 Viewcontroller 添加,布局,设置 View
- 连接 outlets 和 actions
- 用 segue 创建 view controller 间的关系
- 为不同的 size classes 创建对应的 layout
- 为 views 添加各种手势
Handling User Interactions
View Controller 很少直接参与响应事件,而是采用下面的方式:
- 定义 action 方法处理一些高等级的事件
- 控件事件
- 手势识别
- 观察由系统或其他对象发出的通知
- 扮演其他对象的 data source 或 delegate
Displaying Your Views at Runtime
Storyboards 使载入 View 这一过程变得异常简单,UIKit 会在需要时自动从 Stroyboards 中导入 views。整个步骤如下:
- 使用 storyboard 中的文件来实例化 views
- 连接所有的 outlets 和 actions
- 分配 root view 给 view controller 的 view 属性
- 调用 view controller 的 awakeFromNib 方法。该方法被调用时,view controller 的 trait collection 为空,并且 views 可能还没有到相应的位置上
- 调用 view controller 的 viewDidload 方法
在 View 出来之前,UIKit 给你额外的机会来准备这些 view(出现在屏幕前和出现在屏幕后)
- viewWillAppear: view 出现在屏幕前调用
- 更新 views 的 layout
- 显示在屏幕上
- 出现之后,调用 viewDidAppear:
当你添加、移除、修改 views 的尺寸,位置,记得移除相关的 constraints,对你的视图层次结构的布局相关更改会导致 UIKit 来标记为脏布局,在下次 runloop,layout 引擎会重新计算
Managing View Layout
当 view 的位置和尺寸发生变化时,UIKit 会更新 view 层级的 layout 信息,对于使用 Auto Layout 的系统,UIKit 会向一些相关对象更新约束信息,这样可以做出相应的改变。
在 layout 进程中, UIKit 会在下面一些时间点让你做一些 layout 相关的事情,对应的 view controller 会做下面的一些操作:
- 在必要时,更新 view controller 的 trait collections 以及相关的 view
- 调用 viewWillLayoutSubviews
- 在当前 UIPresentationController 对象上调用 containerViewWillLayoutSubviews 方法
- 在 view controller 的根 view 上调用 layoutSubviews 方法。该方法默认会使用当前可用的约束
- 计算新的 layout 信息,然后在 subview 上依次调用 layoutSubviews 方法
- 应用新计算出的 layout 约束
- 调用 View controller 的 viewDidLayoutSubviews 方法
- 在当前 UIPresentationController 对象上调用 containerViewDidLayoutSubviews 方法
View controller 可以使用 viewWillLayoutSubviews 和 viewDidLayoutSubviews 方法在 layout 过程中来执行一些额外的操作,比如在 layout 前,增加或移除 views,更新 views 的尺寸 和大小,更新约束或者是 view 相关的属性。在 layout 后,你可能会重新载入数据,更新 view 的内容,或者确定 view 最终的尺寸和位置。
这里是一些高效管理 layout 的小贴士:
- 尽量使用 Auto Layout
- 利用 the top and bottom layout guides,可以确保你的内容始终是可见的(不会被状态栏,导航栏,tab bar 和 toolbar 遮挡住)
- 当你增加或移除 views 后,记得更新 constraints
- 临时移除 constraints 可以让 view 动画起来(移除完了再添加回来)
Managing Memory Efficiently
- Initialization methods VC 的初始化方法中,确保 VC 到一个确定的状态
- viewDidLoad 载入需要显示的数据
- didReceiveMemoryWarning 内存紧张时调用
- dealloc 做一些清理工作
Implementing a Container View Controller(容器vc)
容器 view controllers 将许多 view controllers 的内容归并到单独的界面上,容器类 view controllers 通常用于内容导航,如 UINavigationController, UITabBarController, and UISplitViewController
Designing a Custom Container View Controller
容器类 VC 与 内容类 VC 不同之处在于 容器VC 的一部分内容来自于 内容VC,这部分显示内容表现为其他 VC 的 view,且被嵌入进自己的 view 层级中,容器VC会决定这些嵌入 view 的位置和尺寸,但是这些嵌入的 view 仍然被其自身的 VC 所管理。
设计你自己的 容器类VC,需要理解容器和内容 VC 之间的关系,在设计过程中,考虑以下几个问题:
- 思考容器与其中的内容扮演的角色
- 有多少内容可以被同时显示
- 这些子内容的 VC 之间的关系是什么
- 这些子 VC 如何从容器中添加与移除
- 这些子 view 的位置和尺寸能否发生变化,当变化发生时,容器该如何对应这些变化
- 容器能否提供任何装饰性或导航相关的视图
- 容器与子内容直接的必要通讯是怎样的,容器是否需要将相关通知事件通报给子内容
- 容器的外观是否可以被定制,如果可以,怎么做?
UIKit 要求你在 容器 VC 与 子 VC 建立正式的父子关系,这种父子关系会确保 子VC 会收到所有相关的系统通知
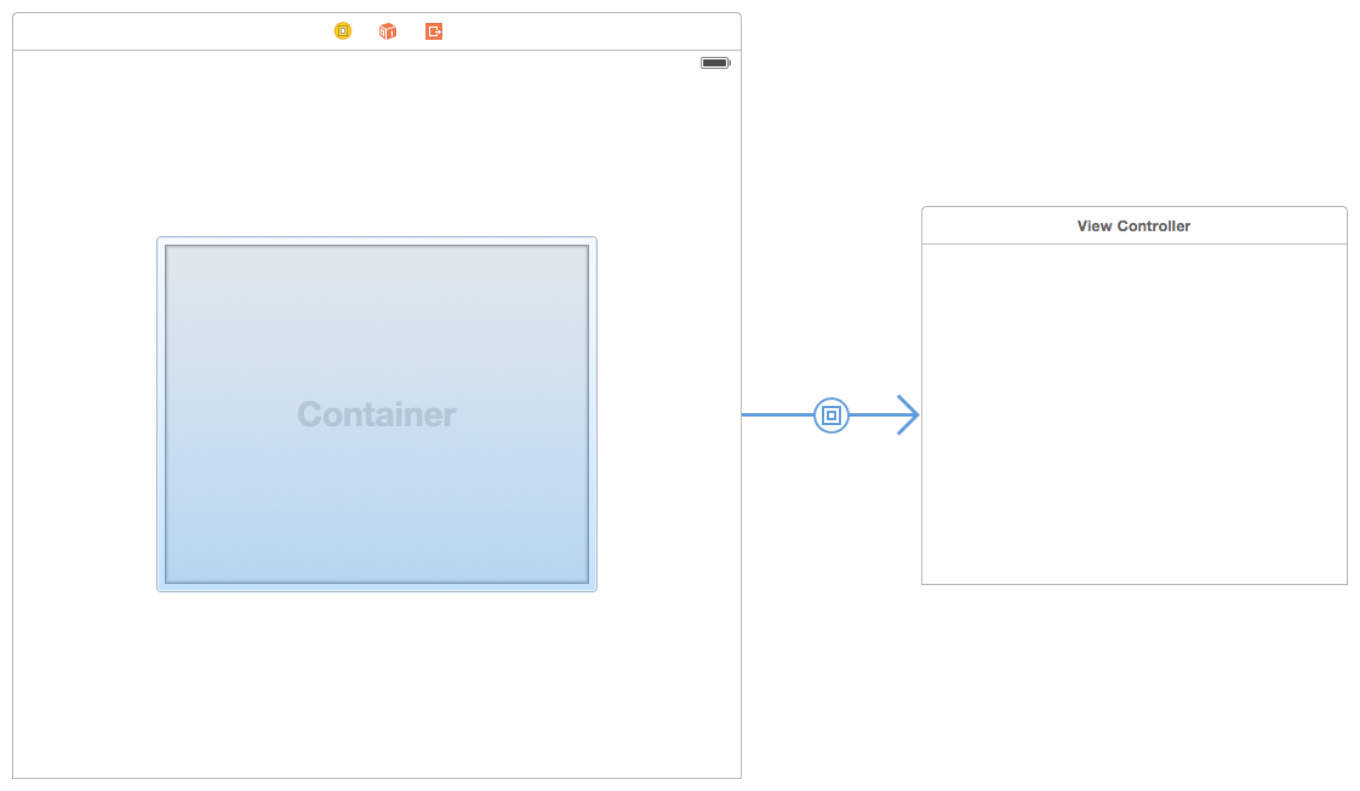
Configuring a Container in Interface Builder
在 storyboard 中创建一个父子关系的容器,非常容易,拖一个 container view object 到 VC 上,里面可以嵌入任意的 child VC,你可以随意更改 container view 的尺寸和位置
Implementing a Custom Container View Controller
为了实现一个 容器类 VC,你必须建立这种父子关系,即你的 fVC 和 其他 cVC 的父子关系,即让 UIKit 知晓你的 fVC 管理着 cVC 的尺寸和大小,你可以通过 IB 或代码方式实现这种关系,当使用代码方式创建父子关系时,你可以明确的添加或移除 子VC 作为 View Controller 设置的一部分。
Adding a Child View Controller to Your Content
通过代码方式将 child view controller 纳入你的 容器 VC,一般通过以下步骤:
- 在容器 VC 上调用 addChildViewController:
- 将子 VC 的根视图添加到容器 VC 的 view 层级结构上,这步别忘了设置子 view 的 frame 的位置和尺寸
- 为 child's root view 添加约束
- 在子 VC 上调用 didMoveToParentViewController:
- (void) displayContentController: (UIViewController*) content {
   [self addChildViewController:content];
   content.view.frame = [self frameForContentController];
   [self.view addSubview:self.currentClientView];
   [content didMoveToParentViewController:self];
}
注意在 子VC 上调用了 didMoveToParentViewController 方法,这是因为调用 addChildViewController: 时会触发子 VC 的 willMoveToParentViewController: 。所以之后你必须要在 子VC 上调用 didMoveToParentViewController:
当使用 Auto Layout 时,设置在 容器 view 与 子 view 上的约束只会影响 子 VC 的根视图,并不会影响 子 VC 上的 view 层级
Removing a Child View Controller
移除 child view controller 也要遵循下面的步骤:
- 调用子 VC 的 willMoveToParentViewController:
- 移除 子 VC 根视图上的任何约束
- 从容器 View 层级结构中移除子视图
- 在 子VC 上调用 removeFromParentViewController 方法
移除 子 VC 会彻底打破这种父子关系,因此只有在不需要时才会移除。比如 navigation controller 只会在 pop VC 的时候才会移除,而 push 操作的时候并不会
- (void) hideContentController: (UIViewController*) content {
   [content willMoveToParentViewController:nil];
   [content.view removeFromSuperview];
   [content removeFromParentViewController];
}
Transitioning Between Child View Controllers
容器内的 子VC 可以采取动画的方式相互替换,在动画的过程中就是让旧 VC 移出屏幕,让新 VC 移入屏幕。在之后的 completion block 中完成最终的移除。
- (void)cycleFromViewController: (UIViewController*) oldVC
               toViewController: (UIViewController*) newVC {
   // Prepare the two view controllers for the change.
   [oldVC willMoveToParentViewController:nil];
   [self addChildViewController:newVC];

   // Get the start frame of the new view controller and the end frame
   // for the old view controller. Both rectangles are offscreen.
   newVC.view.frame = [self newViewStartFrame];
   CGRect endFrame = [self oldViewEndFrame];

   // Queue up the transition animation.
   [self transitionFromViewController: oldVC toViewController: newVC
        duration: 0.25 options:0
        animations:^{
            // Animate the views to their final positions.
            newVC.view.frame = oldVC.view.frame;
            oldVC.view.frame = endFrame;
        }
        completion:^(BOOL finished) {
           // Remove the old view controller and send the final
           // notification to the new view controller.
           [oldVC removeFromParentViewController];
           [newVC didMoveToParentViewController:self];
        }];
}
Managing Appearance Updates for Children
当 子 VC 添加到 容器 VC 中,容器 VC 会自动转发 外观类的信息 给 子 VC,但是如果你想要控制这一过程,可以覆盖 shouldAutomaticallyForwardAppearanceMethods 方法,让其返回 NO,在外观改变时,手动调用 子 VC 的 beginAppearanceTransition:animated: 和 endAppearanceTransition 来控制 子 VC 的外观变化
-(void) viewWillAppear:(BOOL)animated {
    [self.child beginAppearanceTransition: YES animated: animated];
}

-(void) viewDidAppear:(BOOL)animated {
    [self.child endAppearanceTransition];
}

-(void) viewWillDisappear:(BOOL)animated {
    [self.child beginAppearanceTransition: NO animated: animated];
}

-(void) viewDidDisappear:(BOOL)animated {
    [self.child endAppearanceTransition];
}
Suggestions for Building a Container View Controller
实现一个容器其实要考虑的事情很多,有如下建议:
- Access only the root view of a child view controller. 父容器仅仅能访问 子 VC 的根视图,即容器不应该访问 child 的其他子视图
- Child view controllers should have minimal knowledge of their container. 子 VC 要对自身的父容器知道的尽可能的少
- Design your container using regular views first. 设计容器 VC 时,先用基本的视图来试验下尺寸,位置,约束什么的,不着急拿 child View 来做
Delegating Control to a Child View Controller
容器 VC 可以将自身外观委托给 child VC 来决定,一般有如下方式:
- 让 子 VC 来决定 status bar style,你需要在 容器 VC 中实现 childViewControllerForStatusBarStyle 和 childViewControllerForStatusBarHidden
- 让 子 VC 决定合适的尺寸,容器VC 可以根据 子 VC 的 preferredContentSize 属性来设置灵活的 layout
Preserving and Restoring State
View controller 可以保留 app 的一些设置,以便于下次启动时恢复上次的设置。保留和恢复状态的过程是自动的,但你要告诉 iOS 你 app 的那部分数据需要保存,通常需要做以下步骤:
- (必须)分配一个 恢复标识符 给你的 VC
- (必须)告诉 iOS 在启动时,如何创建或定位一个新的 view controller
- (可选)为每一个 view controller,存储那些需要返回到原始配置的数据
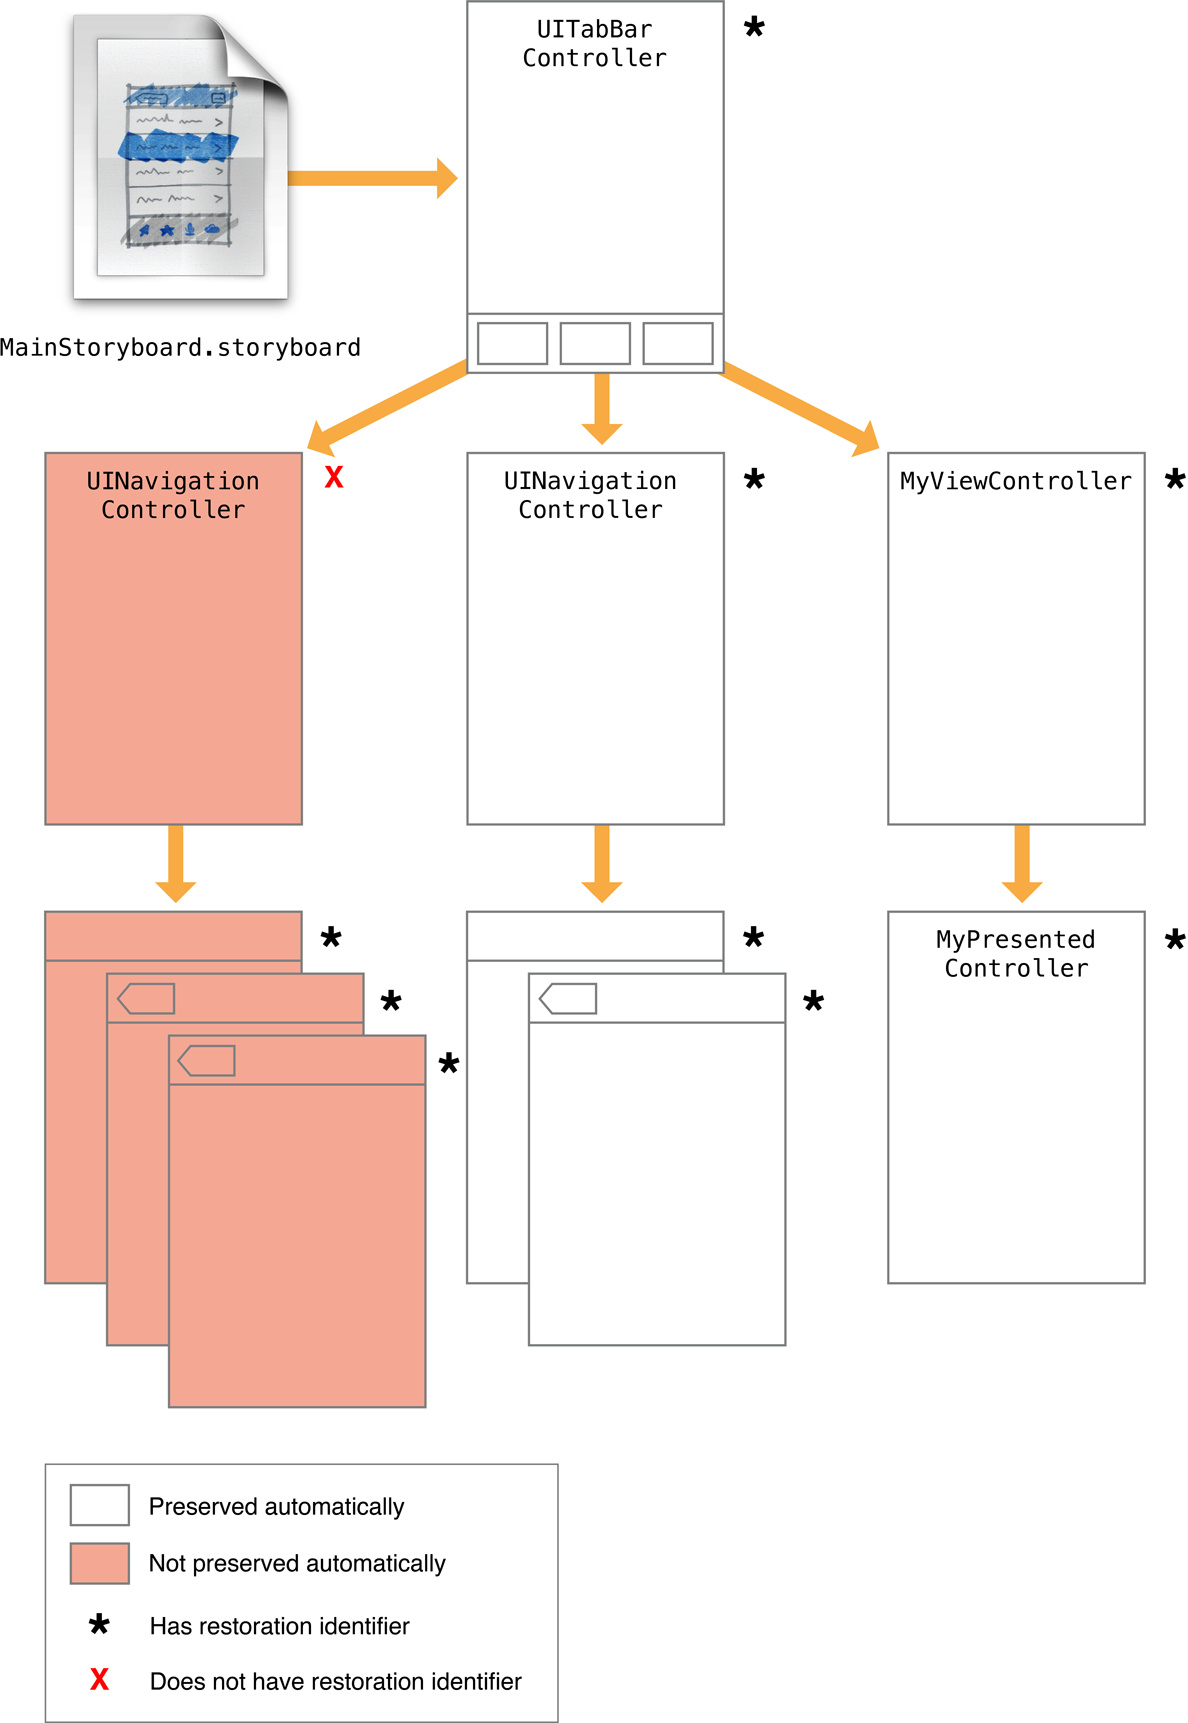
Tagging View Controllers for Preservation
UIKit 只会保存你告诉他需要保存的 VC,每个 view controller 都有一个 restorationIdentifier 属性,默认值为 nil,只有你为其设置一个有效的字符串,UIKit 才能保存 VC 状态,你可以通过编程方式和 storyboard 的方式来为其分配一个值。
当你分配了一个 restoration identifiers,记住所有的 父 VC 也必须有一个 restoration identifiers,在保存过程中,UIKit 会从 windows 的根 VC 一直到 view controller 的整个继承树,如果其中的一个 VC 并没有 restoration identifier,那么他和他的子 VC 都会被忽略
Choosing Effective Restoration Identifiers
UIKit 稍后会使用你的 restoration identifier 字符串来创建 view controller,restoration identifier 一般要求唯一的。
Excluding Groups of View Controllers
想要某个 VC 极其 子 VC 都不被保留,可以设置 父 VC 的 restoration identifier 为 nil
在保留状态时,排除一部分 VC,并不会在稍后的恢复过程中移除他们,而是这部分 VC 将会通过 SB 创建,而那些保留了状态的,则通过 restoration 过程创建
从自动保持状态中排除这些 VC 并不妨碍你手动来保存
Preserving a View Controller’s Views
一些 view 的状态信息也需要保持,比如 scrollView 的 scroll position,而这些状态信息与 VC 关系不大。
- 为 view 的 restorationIdentifier 属性分配有效的字符串
- 该 view 的 VC 也要有一个合法的 restorationIdentifier
- 对于 table view 和 collection views 配置一个 data source 部署 UIDataSourceModelAssociation 协议
为 View 分配一个 restoration identifier,告诉 UIKit 将 view 的状态写入 preservation archive,稍后 VC 恢复时,UIKit 也会将 view 恢复到之前的状态。
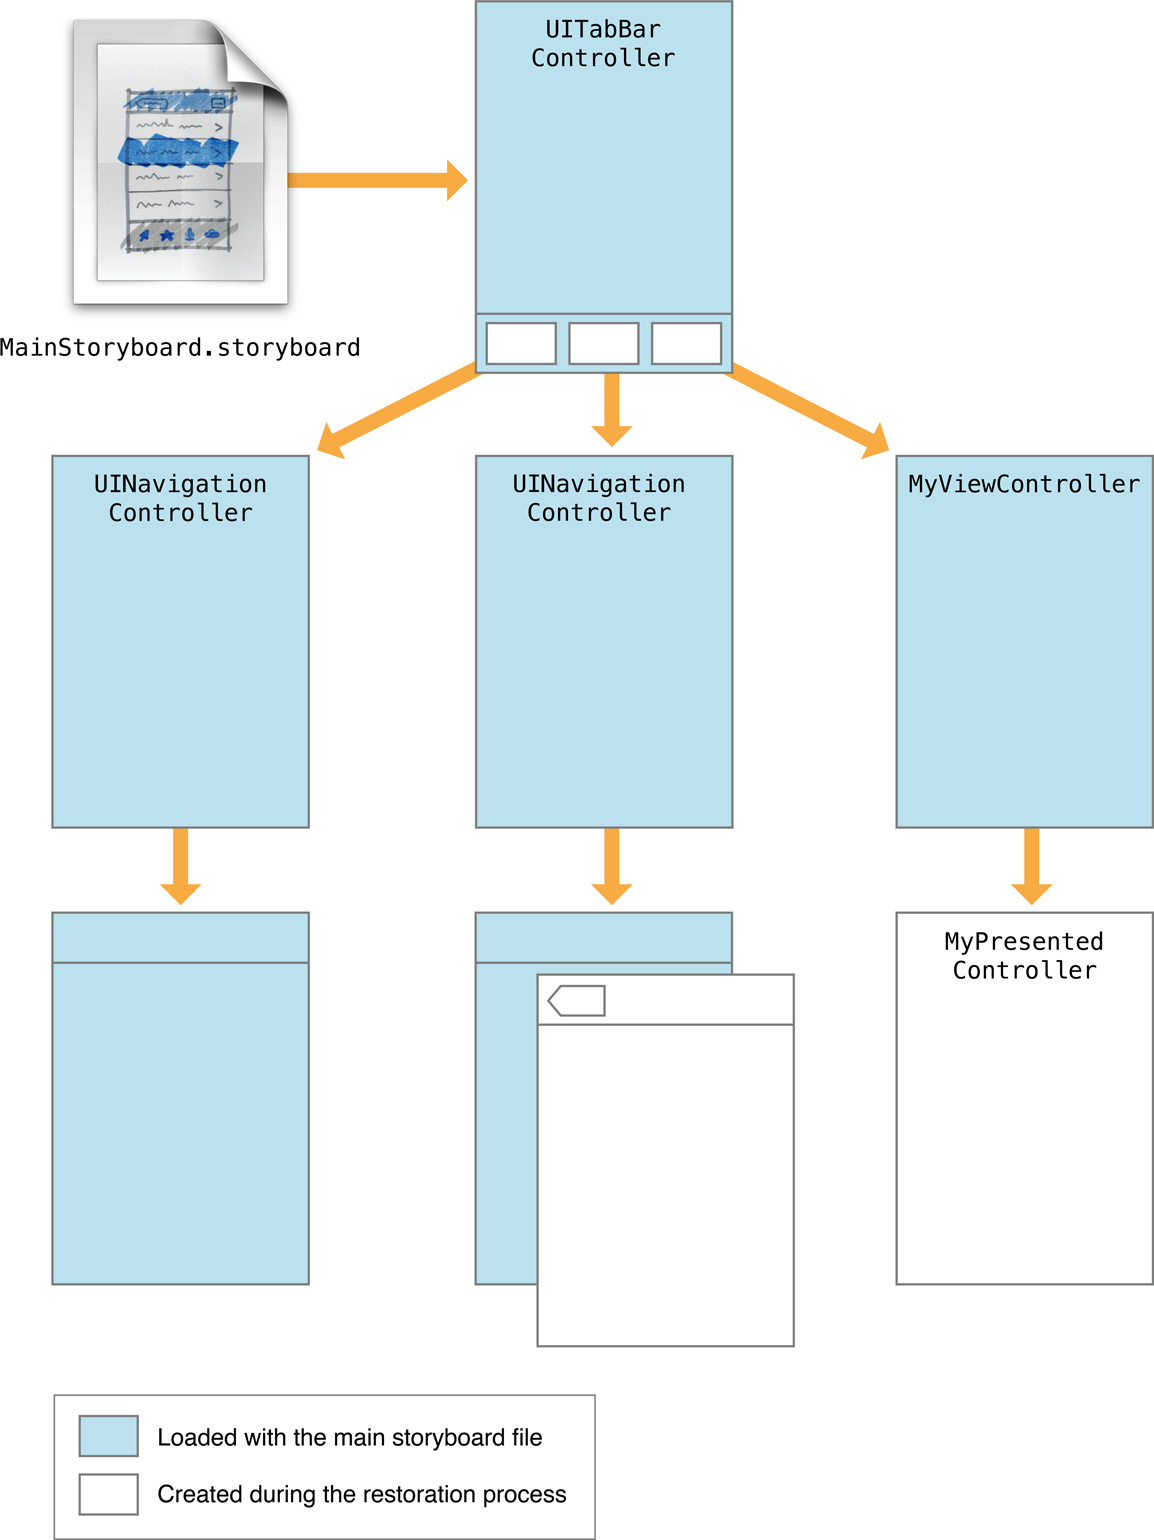
Restoring View Controllers at Launch Time
在第一次启动时,UIKit 会创建或找出相关的 VC,来组成用户界面,UIKit 会按照如下顺序来找出 VC:
- 如果 view controller 有一个 restoration 类,UIKit 会请求这个类提供 view controller。 UIKit 会调用 viewControllerWithRestorationIdentifierPath:coder: 来检索恢复相关 view controller
- 如果 view controller 没有一个 restoration 类,UIKit 会要求 app delegate 来提供这个 view controller。UIKit 会调用 application:viewControllerWithRestorationIdentifierPath:coder: 来查询没有 restoration 类的 view controller。如果返回 nil,则尝试查找隐含的 VC
- 如果 view controller 存在正确的 restoration 路径,则 UIKit 会使用这个对象。即启动时,UIKit会基于这些路径来找到他们
- 如果这些 view controller 最初是通过 storyboard 文件加载的,UIKit 使用这些保持的 storyboard 信息来定位和创建,在恢复过程中,UIKit 会找到相关的 storyboard 文件来进行初始化。
将 restoration class 分配给 view controller,会阻止 UIKit 隐式搜索 VC。使用 restoration class 给你在『是否真的想要创建一个视图控制器』上更多的控制权。例如,如果您的类决定 VC 不应该被重新创建,则 viewControllerWithRestorationIdentifierPath:coder: 方法可以返回 nil。当没有 restoration class 可以展示时,UIKit 将尝试找到或创建 view controller 然后恢复他。
当你使用 restoration class 时,viewControllerWithRestorationIdentifierPath:coder: 会创建一个类的新实例,执行最小化的初始化,然后返回所产生的对象。下面的例子中展示了如何使用该方法从 storyboard 中恢复 view controller
+ (UIViewController*) viewControllerWithRestorationIdentifierPath:(NSArray *)identifierComponents
                      coder:(NSCoder *)coder {
   MyViewController* vc;
   UIStoryboard* sb = [coder decodeObjectForKey:UIStateRestorationViewControllerStoryboardKey];
   if (sb) {
      vc = (PushViewController*)[sb instantiateViewControllerWithIdentifier:@"MyViewController"];
      vc.restorationIdentifier = [identifierComponents lastObject];
      vc.restorationClass = [MyViewController class];
   }
    return vc;
}
当手动重新创建 VC 时,重新分配恢复标识符(restoration identifier)和恢复类(restoration class)是一个好的习惯。恢复状态最简单的办法是抓取 identifierComponents 数组中的最后一项并将其分配给您的 view controller。
在启动时对于那些从 main storyboard 文件中创建的对象,不要为每一都创建新的实例,而是让 UIKit 隐式地找出来,或者通过 application:viewControllerWithRestorationIdentifierPath:coder: 方法来找出存在的 objects
Encoding and Decoding Your View Controller’s State
你可以在保留状态阶段通过 encodeRestorableStateWithCoder: 和 decodeRestorableStateWithCoder: 方法来对状态进行加密和解密,这个过程是可选的,但被官方所推荐,你可以保持和恢复如下类型的信息:
- 正在显示的任意数据信息
- 对于容器 VC,当前的 child vc 的引用
- 关于当前选中的信息
- 对于用户可配置的视图,保持当前的配置信息
在你的加密(encode)和解密(decode)方法中,你可以加密任意对象和数据,这就要你的对象支持 NSCoding 协议。但是 view 和 view controller 除外,因为并不使用 NSCoding 来保持他们的状态,而是 coder 保存这些对象的 restoration identifier ,然后添加到 preservable 对象列表中,这会导致 encodeRestorableStateWithCoder: 方法被调用
- (void)encodeRestorableStateWithCoder:(NSCoder *)coder {
   [super encodeRestorableStateWithCoder:coder];

   [coder encodeInt:self.number forKey:MyViewControllerNumber];
}

- (void)decodeRestorableStateWithCoder:(NSCoder *)coder {
   [super decodeRestorableStateWithCoder:coder];

   self.number = [coder decodeIntForKey:MyViewControllerNumber];
}
Coder 对象在加密和解密过程中并不会共享,因此对于每一个对象来说,这个 coder 对其来说都是独一为二,你也不用担心命名空间冲突之类的问题
Tips for Saving and Restoring Your View Controllers
当你的 view controller 支持 preservation 和 restoration,请遵循以下指导方针:
- 您可能并不想要保留所有视图控制器
- 避免在恢复过程中 VC 之间相互交换信息
- 按照规范使用 view controller,随后系统保存状态时才能如你所愿的工作
Presenting a View Controller
一般有两种方式显示 View Controller 到屏幕,嵌入到 容器 View(如Navigation Controller)和直接 present
一、The Presentation and Transition Process
你可以使用 segues 和 programmatically的方式来实现
1. Presentation Styles
UIKit 提供了一些基本的 presentation styles,除了这些基本样式,我们也可以定义自己的,先来看一下这些样式定义
enum UIModalPresentationStyle : Int {
    case FullScreen
    case PageSheet
    case FormSheet
    case CurrentContext
    case Custom
    case OverFullScreen
    case OverCurrentContext
    case Popover
    case None
}
默认 presenting a view controller 到屏幕上使用的是 UIModalPresentationFullScreen 这种模式下,UIKit 通常会在过渡完成后移除 presentingVC 的 View,而使用 UIModalPresentationOverCurrentContext 则不会
2. Transition Styles
Transition styles 决定了展示一个 presented view controller 的动画类型,同样也可以自定义,我们先来看一下基本类型:
enum UIModalTransitionStyle : Int {
    case CoverVertical
    case FlipHorizontal
    case CrossDissolve
    case PartialCurl
}
3. Presenting Versus Showing a View Controller
UIViewController 类提供了两种方式显示一个 VC
- showViewController:sender: 和 showDetailViewController:sender: 提供了自适应和灵活的方式来展示一个 VC,该方法让 presentingVC 来决定如何处理 presentation。比如一个 容器 View 可能会把将要显示的 VC 合并为自己的 child,而不是默认地用 modally 的方式去展示
- presentViewController:animated:completion: 总是 modally 地去显示
使用 showViewController:sender: 和 showDetailViewController:sender: 通常会是首选的方式
二、Presenting a View Controller
- 使用 segue
- 使用 showViewController:sender: 和 showDetailViewController:sender:
- 使用 presentViewController:animated:completion:
1. Showing View Controllers
使用 showViewController:sender: 和 showDetailViewController:sender: 遵循如下过程:
- ①. 创建 PresentedVC
- ②. 设置 PresentedVC 的 modalPresentationStyle
- ③. 设置 PresentedVC 的 modalTransitionStyleproperty
- ④. 调用 showViewController:sender: 和 showDetailViewController:sender:
2. Presenting View Controllers Modally
和上面类似,除了第 ④ 步 调用 presentViewController:animated:completion:
3. Presenting a View Controller in a Popover
Popovers 需要一些额外的设置,除了设置 presentation style 为 UIModalPresentationPopover 之外,还需要做如下设置:
- 设置 PresentedVC 的 preferredContentSize 属性
- 从 PresentedVC 的 popoverPresentationController 属性获取 UIPopoverPresentationController 对象,该对象负责管理显示内容到一个 popover 中。接下来你就可以设置 popover 的 anchor point 了,有下面两种方式,任选其一:
- 设置 UIPopoverPresentationController 对象的 barButtonItem
- 为 UIPopoverPresentationController 对象的 sourceView 和 sourceRect 设定指定的区域
你还可以通过 UIPopoverPresentationController 对象调整 popover 的外观
三、Dismissing a Presented View Controller
Dismiss 过程调用 dismissViewControllerAnimated:completion: 方法,如果 PresentedVC 有数据要传回 PresentingVC,请使用 Delegate 模式
四、Presenting a View Controller Defined in a Different Storyboard
如果你的 PresentedVC 是在 Stroyboard 中定义的,那么如下:
UIStoryboard* sb = [UIStoryboard storyboardWithName:@"SecondStoryboard" bundle:nil];
MyViewController* myVC = [sb instantiateViewControllerWithIdentifier:@"MyViewController"];

// Configure the view controller.

// Display the view controller
[self presentViewController:myVC animated:YES completion:nil];
阅读 &转载到(四)了